You can manage your website pages using the Edit Pages section. The tasks you can perform here include:
Adding, deleting, and renaming pages
Changing the order and hierarchy of site pages
Adding or editing the content on pages
Adding keywords and descriptions for search engine optimization
You should set up and preview your site prior to editing pages. Become familiar with what your site looks like and make notes of what you want to change before editing the structure of your site.
You can have up to 12 pages at the root level of your website. Only two levels of page are permitted. To add a page do the following:
Log in to your Site Builder account.
Click Site Design > Edit Pages on the menu bar.
Click the Add button, and then select the type of page to create. You can choose a custom page or one of the 8 standard pages included with Site Builder.
Edit the information in each section as needed. If a section is collapsed, click the down arrow in the section header to expand the section.
Page content. Use this section to change the identifiers used for a page, as well as to add, edit, or delete content for the page.
Component
Description
Page name
Name that displays at the top of the page and in your site's menu bar; not editable for the event calendar and life cycle events pages
File name
Name that appears after the domain name in the URL for the page; not editable for the event calendar and life cycle events pages
Example: If the URL for the page is http://samplesite.com/newsletters.htm, the domain name is samplesite.com and the file name is newsletters.htm. This property cannot be edited for the event calendar and life cycle events pages.
Title
Name displayed in the browser title bar; not editable for the event calendar and life cycle events pages
Page text
Text to display on this page in addition to any standard content; use the formatting tools beneath the text box to format the content
Important: For custom pages, you must enter the needed content, otherwise the page will be blank
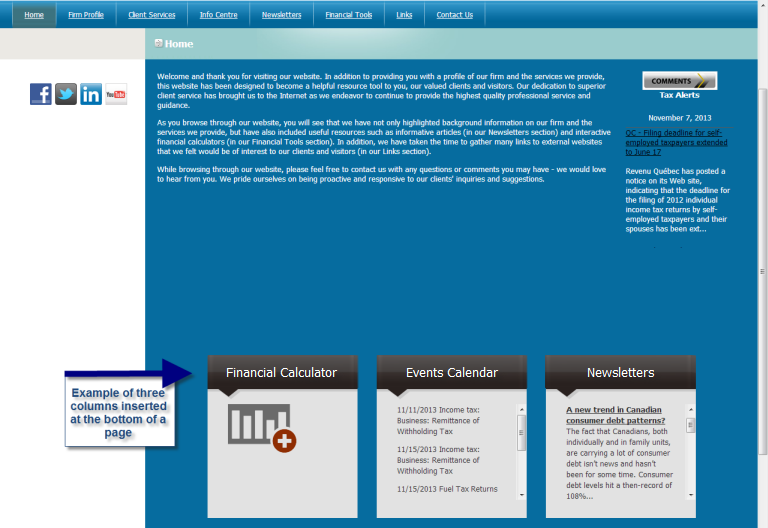
Edit Columns. Use this section to add a section containing information or links beneath the main content of the page. These columns will display above the bottom navigation bar, if the site style you have chosen includes one.
Select the Show columns on this page option check box if you want columns of content to display beneath the main content of the page. Clear this box if you do not want additional content to display. This option is selected by default for Web site Home pages only.
To change the look of the columns, select an option from the Select a style for this section list.
If needed, add or remove columns on the layout. Click the add button to add up to three columns. Click the delete button beneath a column to remove the column from the layout. Keep in mind the following:
The site design can affect the way the columns display on your site. For example, in a narrow site design, your columns may be stacked on top of each other instead of displaying side-by-side. Always preview your site before publishing so you can check for unexpected display issues.
You can have a different number of columns on each page of your site.
When your website is viewed on mobile devices, columns will be stacked on top of each other.
To ensure that your site presents a professional appearance, avoid including too many elements on the home page. For example, as a best practice you should not include the vertical Tax Alerts/Newsletter scrolling pane on the home page with the three-column boxes.
Beneath each column, select the type of link or content to display in that column. You can also create a custom column that displays content that you enter.
Select Custom Column in the box beneath a column.
Enter the column title.
In the Content box, enter and format the information you want to display in the column.
Click Accept.
Note: If you need to edit the column after it is created, click the Configure button
Search Engine Optimization (SEO). Add keywords and descriptions that will make your page more visible in Web searches. See About Search Engine Optimization for more information.
Repeat steps 3 and 4 until you have made all needed changes.
Click Accept to save your changes.
Click Preview to see what your site will look like when your changes are applied. The preview opens in a new different browser tab or window.
Click Publish to immediately update your Website, or click Next to continue to the next page.
Some options described in the Help may not be available to you based on your subscription type. If you have a question about an option you do not have access to, please see your system administrator.
 , and then select the type of page to create. You can choose a custom page or one of the 8

 button.
